end wall flashing detail
Setting it down directly on the Through the Wall Z Bar will block the weep holes. The final step in endwall trim installation is.

Pin On Woodwork
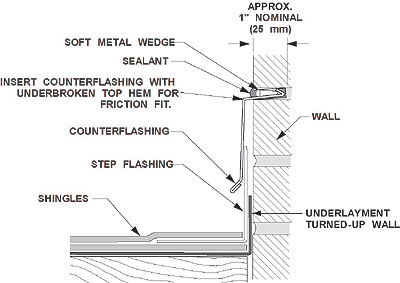
The first detail shows the typical method of flashing a brick wythe.

. The down direction harnesses the force of gravity and the out direction gets the water away from the building enclosure assemblies openings components and materials. Drip edge metal valley flashing dormer chimney and kick-out flashing shed water away from the connections between roofs walls chimneys and other building assemblies. 330 769-3546 Toll Free.
A sidewall is a junction between a wall and a sloped portion of a roof. Wall To Roof Flashing For Non-Wall Supported Deck Typical - PG-LS-WALL-01-3D. This Weep Metal Edge is placed about 18 to 14 above the top of the Vertical BlockingBacking Material to provide positive drainage onto the Through the Wall Z Bar Flashing.
Before we install the end wall flashing we have to apply tape sealant to the top of the Z trim so that theres a water tight barrier between the end wall flashing and the top of the Z. End dams are constructed by cutting and folding the flashing material. In general the sooner water is directed out the better.
International masonry institute team masonry detailing. The End Wall Flashing provides protection where a roof intersects with a vertical wall. The pan flashing surface is a durable waterproof material that provides a continuous water barrier without holes tears or wrinkles that could retain water in the opening.
Beyond end of lintel cavity insulation not shown for clarity of detail sealant note. This is particularly so for details such as door and window corners and for flashing that has exposed fastenings. Specify which trim piece is needed and the roof pitch when ordering.
A critical and often overlooked design detail is at the termination of a parapet coping at a wall. The omittance of the termination metal leaves an opening at the top of the coping and allows for moisture infiltration at the. On center and a minimum of 10 ft.
Cavity filter cavity walls construction details corner flashing end dams flashing moisture parapet flashing single. The coping flashing locks into this strip then runs over the old wall. Laps are heat-welded and the process continues until the wall flashing is complete.
This collection of 18 articles animations and videos identifies the critical roof flashing areas illustrates durable roof flashing details and shows how to flash roofs. Correct flashing and detailing will improve the overall appearance of the finished job. Hyload Headquarters 5020 Enterprise Parkway Seville Ohio 44273 Email.
Flashing must be installed by a skilled tradesperson if quality results are to be achieved. The pan flashing has end dams at the sides to prevent water from moving laterally into the wall. The top edge of the base flashing is cleated to the new wall.
Boot collar flashing at all roof penetrations. The horizontal part of the flashing will vary depending on the type of roof-covering material. Wall area see B in Figure 82.
The advice given in this manual is consistent with the requirements. Preventing wind-blown water getting under the edge of the flashing laid over the roof by downturning the end of the flashing cladding to the lean-to. Above the roof or higher per manufacturers recommendations.
Next the house wrap is placed over both the Through the Wall Z Bar Flashing and. End-wall flashing is applied where the upward slope of a roof meets a wall. Except where walls are brick the vertical part of the sidewall flashing should extend up behind the exterior wall covering just like with headwalls.
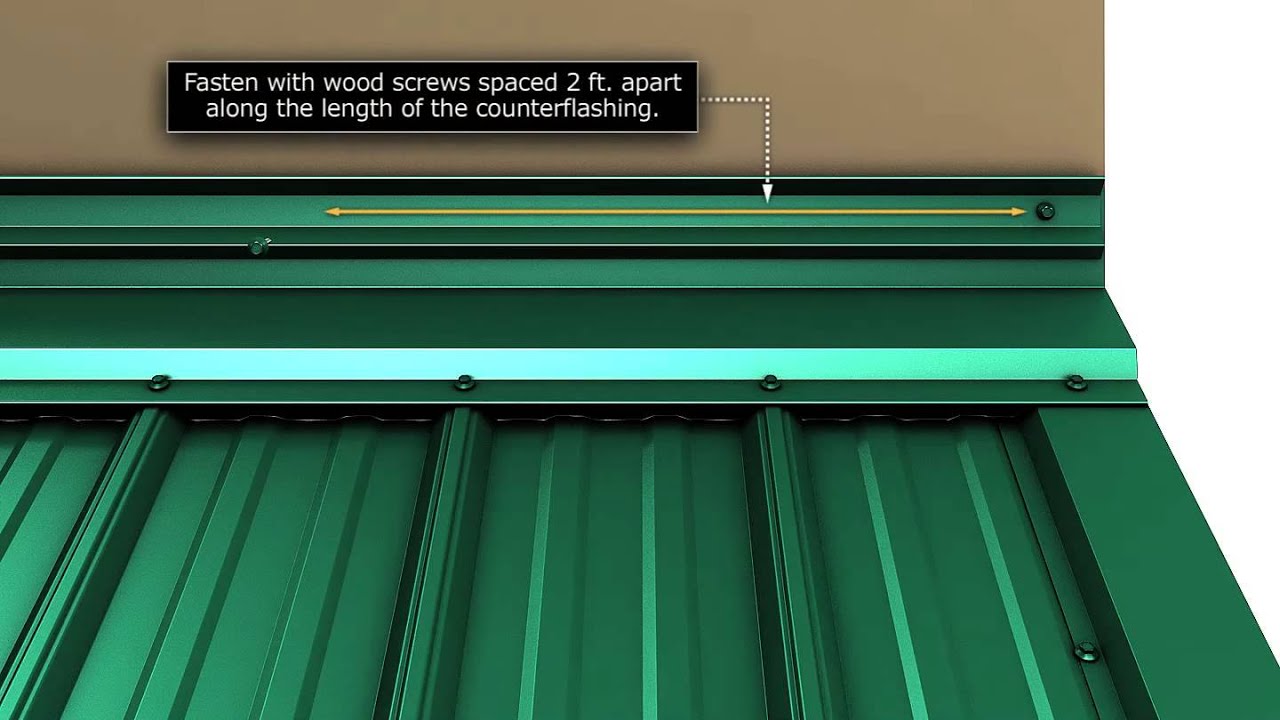
Endwall Flashing Installation. We have our Z trim installed and tape seal on top of the Z trim so we can install this and. Gibraltar End Wall Flashing is made from painted 29 gauge galvanized steel.
Through-wall flashing is installed in the new wall then bent down to lap the base flashing and cleats. Plates and fasteners get installed at the seamvertically up the wall at 12 in. 31 Step and kick-out flashing at all roof-wall intersections extending 4 on wall surface above roof deck and integrated shingle-style with drainage plane above.
The lower edge of the flashing should extend about 12 beyond the face of the brick and have a downward bend to provide a drip. Gravity is the driving force behind drainage. The flashing must extend up at least 8 weeps spaced a maximum of 24 OC and pea gravel are rec-ommended.
Building up the detail Key elements to address with the termination of the flashing at B are. For front end-walls where roofing shingles meet siding the metal flashing strip should be bent using a metal brake to extend at least 2 inches up the vertical wall and at least 3 inches onto the last shingle course. End dam placed prior to through-wall flashing 2 recommended.
Footnote 12 Intersecting wall siding shall terminate 1 in. For chimneys specifically base flashing is the first of two types of flashing applied and sits below the second type of. Installation Instructions For Endwa.
Ca reful design of flashing details to suit the application can help to ensure reliable function and a quality finish. The final thing to do is install the end wall trim. A common lock seam joins it to the base flashing which runs up the face of the new wall at least 9.
Now that youve prepped the Z-trim tops with tape sealant and folded the flashing ends down to overhang the gables you can proceed to fastening the flashing. The maximum parapet wall height is not to exceed the width of a 10-ft. FLASHING GUIDE 3 Correct detailing of LYSAGHT roof and wall flashing has more than cosmetic importance - it is essential in ensuring the wet weather performance of the cladding.
Install Metal Roof Endwall Trim At The Sidewall. The pan flashing laps over the drainage plane beneath the opening. The wall side of the flashing can be covered with siding or counter-flashing and outside closures are necessary to seal between the flashing and the panel.
From any corner or end of wall. The most common mistake at this intersection is to allow the metal coping to but up to the wall without the application of termination metal. Additional information for flashing single-wythe walls particularly architectural concrete masonry walls and means for providing a higher level of structural continuity at flashings is contained in TEK 19-2A ref.
Product Weight lb 5 lb. The ensures that theres a watertight barrier between the end wall flashing and the top of the Z. Ad Henry flashings are guaranteed to protect window installations.
Structural elements may vary and are shown for illustration only. Step By Step Endwall Flashing Installation Instructions On A Metal Roof. Joints are soldered or sealed see.
Detail A is covered by E2AS1 but detail B is not. Prefabricated flashing end dam carry flashing ½ min. End dams should be constructed wherever flashings terminate within a wall to prevent water from simply flowing off the side of the flashing within the masonry wall rather than being directed to weeps where it can flow out of the wall.

Pin On Casa

Pin On 1 House Ideas Cedar

Ghim Tren Wall Details

Pin On Saltbox

Pitched Roof To Brick Wall Pitched Roof Brick Veneer Wall Galvanized Roofing

Pin On Details
Pin By End Studio On Porch Ideas Shingling Masonry Wall Roof Maintenance

Pin On Hawthorne

Pin On Dimensional Data For Housing Design

Pin On Diy Metal Roof

Pin On Construction Information

Pin On Architectural Parapet Details

Parapet Wall To Curtain Wall End Parapet Curtain Wall Membrane Roof

Pin On Metal Roofs

Pin On Detail

Pin On Detailing
How To Install Endwall Trim For Union S Masterrib Panel Metal Roof Installation Roof Installation Metal Roof

Pin On Building Things
Typ Window Head Cavity Wall Brick Veneer Cavity Wall Brick